Monday, April 27, 2015

'Life is Beautiful' card

Hi there!
It's Tina, and I'm back with another creation using the gorgeous Couture Creation dies.
 
 
Tutorial
1. Cut one of the Elegant Card Cuts - Vierge Square from white cardstock, trim the outer edge, leaving 2-3mm as shown in the second photograph. (This die is great because it doesn't cut the outer edge, allowing you to change the size of the frame to suit your requirements)


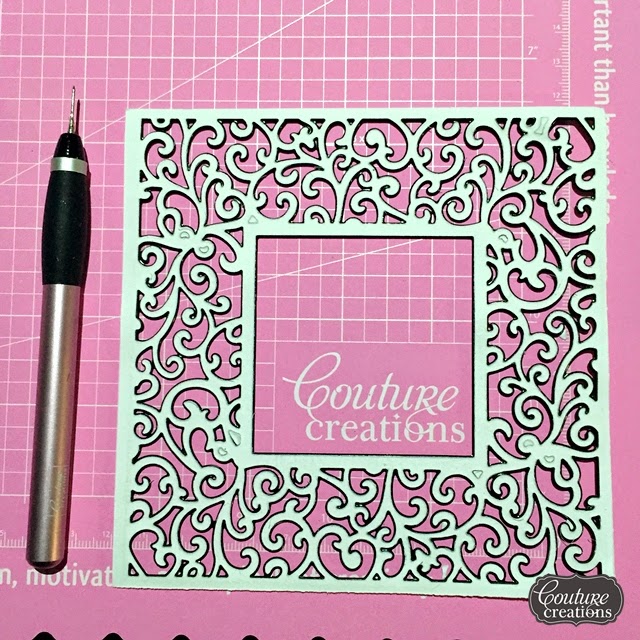
2. Cut a mat using the 9.5cm Square Nesting die from one of the 6x6 Vintage Rose papers.  I cut my card base from a 12x12 sheet in the same pattern.
 

3. Ink edges of mat and card base using a Sponge Dauber.  Attach Vierge Square diecut to card base using the Two Way Glue Pen. (These are fantastic for those delicate pieces)
4. Cut a Touch Of Love heart from white, and 'Life Is Beautiful' from Core'dinations Black Magic.


5. Layer as shown, using 3D Foam Strips under the square paper mat to add depth 

 
(Don't you just love the new Couture flowers?  I had to scatter a few around my card, because they are just so pretty!)
 
 
Couture Creations Products:

CO723042 Nesting Dies - Square


Saturday, April 11, 2015

Memories

 Hi there, it's Tina with a layout to share with you today.  I used the Vintage Rose paper collection which goes perfectly with the dance costumes for my daughter's performance at a local Eisteddfod. 
 
 
Tutorial
1. Cut two of each of the decorative corners and one decorative frame using Amaryllis - Laced Frame.


2. Cut a title and tag with Kalini- Memories Tag


3. Cut three leaves using Everyday Essentials - Autumn Leaf.
 

4. Separate a 6cm Camden Cottage Rose into three sections by gently separating the layers, and cut the largest piece in half.


5. Fussy cut some flowers from patterned paper 
 
 
6. Cut two Amaryllis - Nostalgic Narelle, and a Kalini - Tall Flower Basket from white cardstock and adhere as shown.
 
7. Frame your photos using the decorative corners, and mat one cropped photo onto the frame.  Journal and attach title to the tag, and adhere to the page using 3D Foam Strips.  Attach fussy cut flowers, leaves, and any other embellishments.


Couture Creations Products:


Saturday, April 4, 2015

Life Is Beautiful canvas

 Hi there everyone! 
Don't you just love the new Lindy's colour combo for April?
 
Here's my latest creation, a reverse canvas using Lindy's products along with a few stencils and Couture Creations dies and flowers.
 
 
These colours are fun, and remind me of spring, so naturally I had to use a butterfly, and some flowers.
 

So .....would you like to know how I created it?  Here's my tutorial!
 

1. Apply gesso through a variety of stencils, and allow to dry.  Repeat the process using texture paste.

2. Mix a very small amount of Magnolia Magenta Gold Magicals into some gel medium and mix well.  Add more Magicals if required. Check out the colour change as the magicals are mixed, the intensity of colour is fantastic!  Apply using a stencil and allow to dry.


3. Mist canvas slightly with water and spray patches of  Pink Ladies Pink, Tilt-a-wheel Teal, and Magnolia Magenta Gold.  Allow to dry before spraying Summer Loving Sun so you don't get too much colour mixing.


4. Spray Greased Lightning Green through a leafy stencil and allow to dry.


5. Colour your flowers using a variety of techniques.  I altered these ones from Couture Creations by spraying directly (top left),  painting the centre and transferring colour to the petals using a baby wipe with a small amount of mist on it  (bottom left), spray centre and use baby wipe on outer petals (top right), and just using the baby wipe on raised edges (bottom right).


6. Ink dragonfly, apply Aurora Amethyst embossing powder to the outer wings, and shake off excess.

 7. Cover the rest of the dragonfly with Sunset Yellow Orange embossing powder and melt using heat gun. Emboss diecut leaves using Oakleaf Olive.    Layer your flowers and embellishments on your canvas.


My butterfly was embossed using the technique described above. The quote was embossed with Oakleaf Olive, and the scalloped piece with Tilt-a-wheel Teal embossing powder.


I hope I've inspired you to get creative today.
Happy scrapping,
Tina

Friday, April 3, 2015

Mixed media layout for Lindy's


Hi everyone.
The layout I'm sharing with you today was created using some of the colours from the April Limited Edition set.  They went perfectly with the photos taken during a trip to Melbourne last year, visiting the famous bathing huts at Brighton Beach.
 
 
Here's how I created it....
 
Paint a thin layer of gesso over your cardstock.  Once dry, layer various mediums through stencils and allow to dry.


Lightly mist with water so the mists spread and blend better.   This will give you more of a watercolor effect.  Spray Summer Lovin Sun, Magnolia Magenta Gold, and Tilt-a-wheel Teal in patches, then allow to dry.


Flick some of the colour onto your page, create splats and drips if you like.


Cover chipboard title with embossing ink, and cover the top half with Tilt-a-wheel Teal embossing powder, and return excess to container.  Repeat using Aurora Amethyst on the bottom part, heat, then repeat the process again so your embossing is nice and raised.


Add some gems to embellish, and don't forget your journaling!


Thanks for visiting the blog today.
Happy Scrapping,
Tina
 

Wednesday, April 1, 2015

Lindy's Stamp Gang April Colour Challenge

Hi everyone! Hope you all had a fantastic weekend and found some time to get creative!
 
 I'd like to share with you my DT inspiration piece for the Lindy's Stamp Gang Colour Challenge for April.
 
  Here are the colours for this month.....


And here is the piece I created using Pink Ladies Pink, Magnolia Magenta Gold and Tilt-a-wheel Teal.
 
 
Make sure you check out all the other Design Team creations on the blog, the girls are super-talented, and have come up with some gorgeous projects.
 

LinkWithin

Related Posts with Thumbnails