Thursday, July 30, 2015

Fun and funky background!

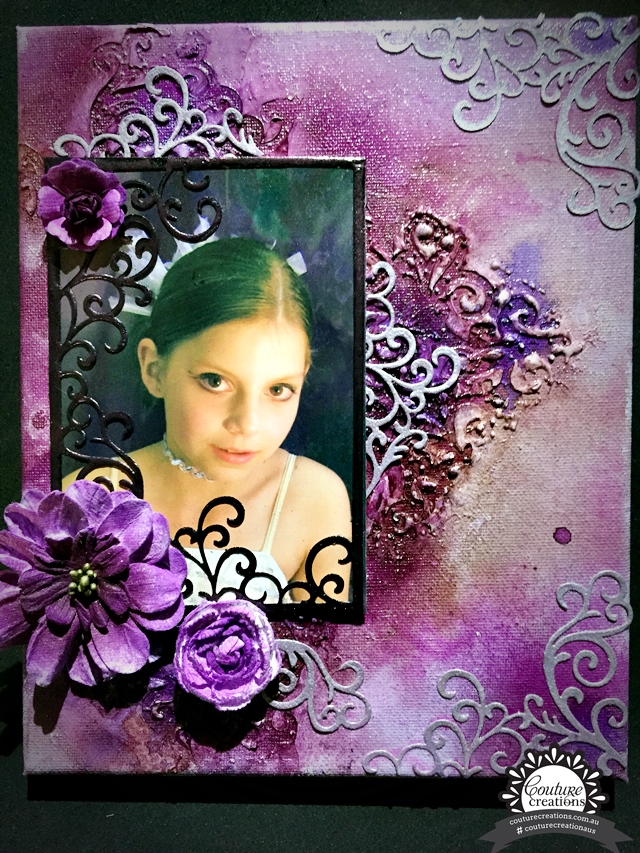
Hi everyone, today I thought I'd share with you a really fun background I created.
 I used lots of different mists and mediums, and the part I love most is that you never know exactly how it will turn out!


I used Glitter Gel and Light Paste through stencils using a palette knife.  Allow to dry, or if you are impatient like me, use a heat gun.  Holding the heat gun close to the medium will cause it to bubble, creating extra texture!


Repeat the priocess using White Sand texture paste, and then with modelling paste.  dry completely before the next step.


Stamp using Leafing Size, allow to dry slightly until tacky, and apply gold leaf.  Brush excess off using a dry paint brush.  Spray different mists, I used Lindy's Stamp Gang Starbursts (which show the gorgeous shimmer on the black), and Flat Fabios (in pastel chalk colours)


Add some sequins, photos, and mistable ephemera pieces and you are done. 

Saturday, July 25, 2015

Merry Christmas in July card

Hi everyone,
 It's a little chilly, so I thought I'd scrap these pics of my trip to Canada (quite a few years ago).  The Christmas Emporium papers were perfect.


I lightly sprayed some mists to give a snowy feeling to my page.


Cut one of each size of 'Evergreen Trees' and lightly mist for a bit of shimmer.


 Cut 'Simone's Style from white cardstock and attach towards lower edge of the page.  
Cut a large mat and layer a few strips of the striped paper beneath photos.


Adhere Evergreen Trees using 3D foam tape to add dimension on the smallest one.


Cut 'Christmas Wish' and use it as a journaling block.  Attach towards top right hand side.


Couture Creations Products:

Next I'd like to share with you, how I made my 'Christmas in July' card.  
Take a sheet of Core'dinations cardstock and trim to 12 inches X 9 inches.  Cut a 3 inch square from the two lower corners using a precision trimmer.  Score fold-lines, your finished card will be 6x6 inches, with the three flaps folded in.


Die-cut two 'Mistletoe' from green card-stock.


Cut one 5 1/2 X 2 3/4 from the header on the sentiments paper, 'Merry Christmas', two sentiment blocks and fussy-cut a foliage cluster.
Cut one 5 1/2 X 5 1/2, and four 5 1/2 X 2 3/4 from green patterned paper.


Cut two foliage pieces as shown.


On the outside of the left and right flap attach green patterned paper, and foliage pieces, highlight with red Glitzn'Glamour.  Attach fussy-cut foliage cluster to the outside of the bottom flap.


Attach patterned paper to the inside flaps as shown, adhere sentiment blocks.  Die-cut a 'Christmas Trinket' from Core'dinations glitter card-stock and attach as pictured.


Highlight holly berries using red Glitz'n Glamour.


And here's what it looks like when closed up. 


Couture Creations products:


Tuesday, July 14, 2015

Brrrr, it's cold outside so I decided to scrap!

Hi there, today I'd like to share with you a fun canvas project that I whipped up.
  

I used the Coteaux Curls die as a stencil with modelling paste, which I heated to cause it to rise and bubble.


Die-cut one Coteaux Curl frame and four of the accent.  Heat emboss the frame and accent pieces.


I sprayed a variety of mists over the canvas and set it aside to dry.


Adhere the die-cut pieces to your canvas, and use foam mounting tape to raise the photograph.


Colour flowers using mists and attach to the canvas.  


Couture Creations Products:


LinkWithin

Related Posts with Thumbnails