Tuesday, March 31, 2015

Flower Power!

Hi, here's a quick tutorial for Off The Rails Scrapbooking ......

I thought I'd show you how I make some of my handmade fabric flowers. 
 

Selct two Alcohol ink colours, and a narrow strip of calico or cotton fabric (approx. 2cm x 25cm)


Dampen calico with rubbing alcohol, or blending fluid.


Apply a few drops of alcohol inks, and scrunch up so the colour spreads.


Allow to dry.


Twist and roll the fabric as shown and then glue to a circle of cardstock


Allow to dry completely before using on your project.


Thanks for dropping by,
Happy scrapping,
Tina
Wednesday, March 25, 2015

Tag, you're it!

Hi there everyone, it's Tina back again with a tag tutorial.  I love to create tags as they can be used in so many ways, such as on a card, layout or attached to a gift.  They are a great way to try out new techniques, or when you only have a small amount of time to create.

1. Cut a tag from Core'dinations cardstock, and emboss it using the Honeypot die and tan Embossing Mat.  (Layer it with cutting plate, tan mat, cardstock, die facing down, cutting plate and run through your die-cutting machine as you normally would to emboss )  Do this a number of times to cover the tag, making sure you line up the pattern.

 
2. Sand to accentuate the pattern.  As you can see I embossed with the die on the back (uncoated side)of the cardstock and sanded the front.  You will get a different effect if you emboss on front.


3. Cut Nopstalgia from cardstock and heat emboss.


4. Spritz background with a shimmery mist. Cut three of the Autumn Leaf, and layer under some muslin.  Attach Nostalgia diecut using Mini Foam Dots behind the photograph.  Add a small title and embellishment and you're finished.


Couture Creations Products:
CO724112 Everyday Essentials - Autumn Leaf
CO724088 Background Savvy - Honeypot
CO724095 Background Savvy - Nostalgia
CO723060 Sanding Block
CO723514 Universal 5x7 Embossing Mat
CO723781 3D Foam Mini Dots

Tuesday, March 24, 2015

Mirabilis card for Couture Creations

Hi everyone, today I'm showcasing a card I created using the new release Mirabilis die from the Heart Ease Collection.  I just love the intricacy of this die, which both cuts and embosses.   

 
And here's the tutorial for you.....
 
 
Cut a card base 12 x 24 cm from Core'dinations cardstock, score and fold in half, to create a square card.  Cut a mat, 11x11cm from Vintage Rose Garden CO723998 and attach to base.
Cut two Postal Squares CO724041 from Vintage Rose Garden CO724017.  Layer the contrasting pattern inside the outer frame, and attach to mat.


Cut two Mirabilis from cardstock and Vintage Rose Garden CO724015, and emboss using a tan embossing mat.  Cut a sentiment from the 'Pink Words' paper.  Layer using 3D Foam Squares, and decorate with Crystal Gemstones and Crystalina Glitter Glue.


Couture Creations Products:
CO721971 Glitzin Glamour Glitter Glue - Crystalina
CO724037 Jumbo tip 2 Way Glue
CO723514 Universal 5x7 Embossing Mat


Friday, March 6, 2015

"Be Yourself" layout for Lindy's Stamp Gang

 Hello again!
I love getting messy with mists and creating textures, so I had heaps of fun creating this layout!  


Here's my tutorial.
 
 
Apply embossing ink through a stencil, and sprinkle Queen Sheba Silver embossing powder in patches.
 
 
Return excess embossing powder to container, and then sprinkle Angel Wings Gold over the remainder of the embossing ink. Melt using a heat gun.


Spray in patches and paint some of the individual bricks using Cosmopolitan Pink, Cape Cod Coral, & Down The Rabbit Hole Starburst sprays, and South Shore Sand Flat Fabio.
 
 
Add some stamping.
 
 
Apply modeling paste through a stencil, allow to dry.  Spray with Shabby Turbine Teal and Cest la vie Cerise, then add splats with Toto's Tornado Black.


Of course you need to add some journaling.  I tend to write mine quite small as I don't want it to dominate the page, plus I don't really like my own handwriting.  But it will be important to the future generations to have your own writing on your pages. 


I added a little Tainted Love Teal Starburst spray in places to create extra contrast.


Happy scrapping,
Tina
 

Wednesday, March 4, 2015

Altered Artist Palette for Lindy's Stamp Gang

Hi there again, I'm back with another project to share with you today.  I'd wanted to create one of these to display in my crafting area, and when I saw the gorgeous colours for this month's challenge, I knew I had to use them for this project. 


So here's my tutorial....
 
 
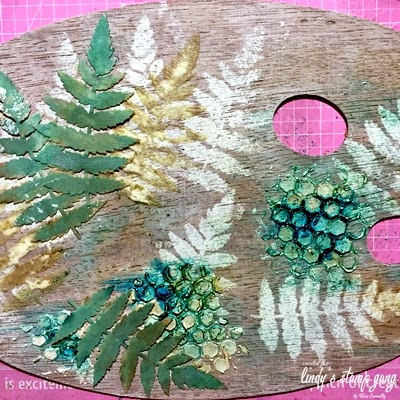
I used the negative from a Couture Creations 'Everyday Essentials '- Beach Fern diecut as a stencil, and sponged on some gesso.
 
 
I also applied a thick coat of crackle medium using a palette knife.
 
 
I applied some modeling paste using the Couture Creations Background Savvy "Honeypot" die as a stencil, then allowed it to dry.
 
 
I cut two hearts using Love Abounds and A Touch Of Love dies from the Couture Creations Floral Lace collection and spritzed one with "Cosmopolitan Pink" and "A Bit o Bubbly" Starburst sprays for some gorgeous shimmer.  The second diecut was embossed using my latest favorite embossing colour.... Angel Wings Gold!
 
 
I sprayed 'I'm Late, I'm Late Slate' and 'South Shore Sand' to colour the background.
 
 
The gesso provides a slight resist so you can gently wipe the spray off with a tissue or baby wipe to reveal the white contrast.
 
 
I used 'Cest la vie Cherise' to paint the leaves.
 
 
'Cest la vie Cerise' was added to the background, with some 'Time Travel Teal' to add a bit more depth. 
 
 
The Imaginarium chipboard pieces were painted with 'Cest la vie Cherise' and 'Time Travel Teal'. I then added  all my embellishments.


I stamped and heat embossed a couple of floral images using Twilight Jade Slate over clear embossing ink.  This creates a subtle effect.
 
 
I mixed Atomic Green Gold Mica powder with some gel medium and threw in a few beads to create some chunky texture.


I hope I've inspired you to create something beautiful today.
Happy scrapping,
Tina

LinkWithin

Related Posts with Thumbnails