Friday, June 24, 2016

Playing with colour

Hi everyone!
Had lots of fun creating this.  It started out as a plain sheet of white cardstock.  Would you like to know how I did it?


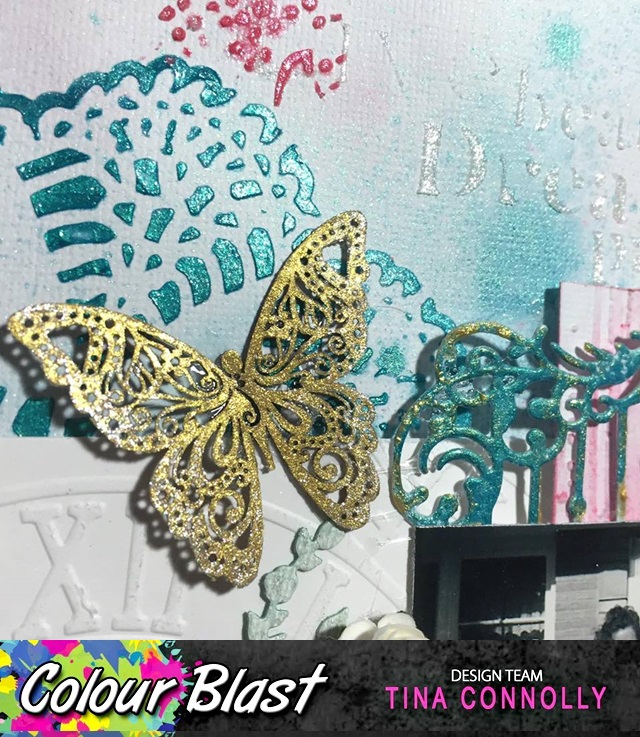
Start by positioning your photos and adhere a few pieces of white cardstock.  Put photos aside and lay a stencil over your page.  Apply texture paste with a palette knife and then while still wet, spread Colour Paste in Bling, Tangerine Dream, and Fire Engine (i found doing this part with your fingers allowed greater control and I was able to create a nice fading effect in places)


Once dry spray Shimmer Mists were sprayed and dripped.  Chipboard pieces were either sprayed or embossed, and the Kutalicious acetate 'fence' was heat embossed (love that these products can be used on so many different bases).  Something else to note is that you get different effects, dependent on the colour of the item you are embossing, how cool is that???

 Lots of layered piece for interest, I love the contrast between the subtlety of the Shimmer Spray with the intense colour and shine of the Colour Pastes.  


I added a bit of stamping using Stazon, don't you love how it turned out? 


Happy scrapping,
Tina

Products:

Wednesday, June 22, 2016

A quick vintage layout!

Hi creative people, hope you're all having a fantastic day!
Just wanted to share a quick and easy layout with you today...


Smear "Snow White" Colour Paste through a stencil and onto the exposed corrugated cardstock.  Mix some "Fire Engine" and "Snow White" Colour Pastes to create a nice pink (or use "Bubblegum")and apply through stencil.  Once dry use a doily stencil with "Deep Water" Colour Paste. 


A few spritzes of "Deep Water" Shimmer Spray, and then spray "Fire Engine" onto a baby wipe, and smear for a subtle washed effect.


Heat emboss the frame diecut and then smear some "Bling" Colour Paste in patches.  Use the "Bling" to colour a butterfly accent.  Use an embossing folder to emboss some cardstock, and apply a little Colour Paste with your finger, to highlight the raised areas.


Happy Scrapping,
Tina

Products Used:


Saturday, June 4, 2016

Another selfie!!!


Hi everyone, I'm super excited to be teaching at the Scrapbook and Papercraft Expo in Brisbane this year, and to share lots of fun techniques using the gorgeous products from Colour Blast.  Make sure you book into my class (Session 2 in Classroom 5) for a chance to win $50 of Colour Blast products!!! How cool is that?  

Make sure you stop in and say hi to the team on our stand, plus.... I'll be demoing each day at 3:00pm at the Tutor Demo Desk.


Today I'd like to share a layout created with (just some) of the "selfies" taken by my eldest daughter at her Grade 12 Formal. 


 I used black cardstock as my background and sprayed 'Tangerine Dream', 'Fire Engine', 'Deep Water', and 'Stormy Weather' through a mask.


Once dry, I smeared 'Snow White' Colour Paste through another mask (use your finger to do this, which allows you to create a very subtle pattern).  Allow to dry and add another layer, with a third mask, this time using 'Deep Water' Colour Paste.


 The chipboard pieces were painted using the Colour Pastes.  To do this just wet a brush and pick up some of the colour.  


The lace was dyed using 'Deep Water' Shimmer Spray.  Dampen the lace a little with a spray of water, which will allow the colour to wick, creating a soft, faded effect.


 The title was embossed using 'Deep Water' Embossing Powder.


And here's my completed layout....


Happy scrapping,

Tina


Colour Blast products:

Colour Blast Shimmer Spray - 'Tangerine Dream', 'Fire Engine', 'Deep Water', and 'Stormy Weather'

Colour Blast Colour Paste - 'Snow White', 'Tangerine Dream', 'Fire Engine', 'Deep Water'

Colour Blast Embossing Powder - 'Deep Water'

LinkWithin

Related Posts with Thumbnails